First say Hello World
通常惯例,我们学习的大部分程序语言基本上第一个程序都是Hello World。1
echo 'Hello World!'
How to build your Hexo
部署Hexo作为个人博客,可以参考的资料很多很多,推荐的是hexo的官方文档,里面有详尽的说明;建议有geek精神的小伙伴们多多参考官方文档学习。
如果觉得阅读官方文档太繁琐,只想按照规则quick start的话,可以继续阅读本文档;
Prepare work
抛开待安装的操作系统,安装配置hexo前需要准备环境如下:
- Nodejs
- Git
这两个基本环境的配置安装,如果有不熟悉的小伙伴,自行科学上网安装,主要说下这两个在部署Hexo中的作用:hexo的安装,以及后期运行过程中均需要nodejs的支持;git的主要用途是管理我们创建的hexo的网站文件。
Install hexo-cli
完成安装nodejs和git后,Terminal终端运行 npm install -g hexo-cli 安装Hexo;安装完成后,Terminal运行命令 hexo -v 出现如下界面,即表示Hexo安装成功: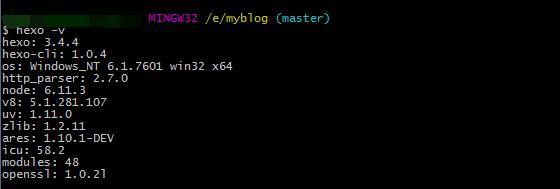
Init blog directory
成功完成hexo的cli安装后,需要在terminal执行 hexo init myblog 命令初始化我们的博客位置,示例中我们初始化的博客的位置为${ROOT_DIR}/myblog,执行完命令后,在myblog文件夹下我们会有如下内容:1
2
3
4
5
6
7
8.
├── _config.yml
├── package.json
├── scaffolds
├── source
| ├── _drafts
| └── _posts
└── themes
具备上述内容说明hexo博客我们离成功安装就差一步了,若需要博客能够正常运行,需要在terminal进入到mybolg文件夹下,执行npm install即可安装hexo博客运行所需要的所有的依赖,执行完后myblog目录下会多出一个node_modules,具体的文件结构如下:1
2
3
4
5
6
7
8
9.
├── node_modules
├── _config.yml
├── package.json
├── scaffolds
├── source
| ├── _drafts
| └── _posts
└── themes
Config hexo
Themes management
上述方式安装的hexo默认使用的是landspace的主题,有的小伙伴可能觉得主题太丑,想更换主题,操作也很简单,本文以当前Star数量最多的NexT主题的安装来说明Hexo的主题管理。
clone 主题至指定目录
在Terminal终端执行如下命令将Next主题拷贝至 ${MY_BLOG_DIR}/themes/next目录下:1
git clone git@github.com:theme-next/hexo-theme-next.git ${MY_BLOG_DIR}/themes/next
修改myblog根目录下配置
修改${MY_BLOG_DIR}/_config.yml文件的内容:1
2
3
4
5# Extensions
## Plugins: https://hexo.io/plugins/
## Themes: https://hexo.io/themes/
### theme: landscape # 默认的主题
theme: next ##新安装的主题,对应的目录位置为 ./themes/next
修改完当前配置后,terminal运行命令hexo server重启hexo,本地调试后即成功替换主题为NexT。使用上述步骤完成Hexo主题更换后发现并不是我们目前博客所使用的主题,原因是因为在主题文件目录${MY_BLOG_DIR}/themes/next下的__config.yml_中的schemes,需要进行修改,修改成如下格式即可:1
2
3
4
5
6
7
8
9 ---------------------------------------------------------------
Scheme Settings
---------------------------------------------------------------
Schemes
scheme: Muse
scheme: Mist
scheme: Pisces
scheme: Gemini
文章显示摘要设置
使用NexT主题后,发现所有的博客文章都是全文显示的,可不可每个文章只显示一句话或者固定长度的文字(即缩略),答案是显示固定长度文字是可以的,在主题文件目录${MY_BLOG_DIR}/themes/next下的__config.yml_修改auto_excerpt即可:1
2
3
4
5# Automatically Excerpt. Not recommend.
# Please use <!-- more --> in the post to control excerpt accurately.
auto_excerpt:
enable: true # 将默认的false改为true
length: 150 # 根据需要决定显示的字数,这里没有修改,默认150字
Nav 设置
使用NexT主题后,默认导航栏,有两个,主页和归档。我们会按照自己的需求添加相应的导航栏,自定义导航栏需要修改主题文件目录${MY_BLOG_DIR}/themes/next下的__config.yml_中的menu:1
2
3
4
5
6
7
8
9
10
11
12
13
14
15
16
17# When running the site in a subdirectory (e.g. domain.tld/blog), remove the leading slash from link value (/archives -> archives).
# Usage: `Key: /link/ || icon`
# Key is the name of menu item. If translate for this menu will find in languages - this translate will be loaded; if not - Key name will be used. Key is case-senstive.
# Value before `||` delimeter is the target link.
# Value after `||` delimeter is the name of FontAwesome icon. If icon (with or without delimeter) is not specified, question icon will be loaded.
menu:
home: / || home
categories: /categories || th
archives: /archives || archive
tags: /tags || tags
about: about || user
#home: / || home
#about: /about/ || user
#tags: /tags/ || tags
#categories: /categories/ || th
#archives: /archives/ || archive
#schedule: /schedule/ || calendar
如上述代码,我们实现了导航栏中首页|分类|标签|归档|关于这五个按钮,完成配置文件的修改后需要在${MY_BLOG_DIR}/source/文件夹下创建 categories,tags,about文件夹, 并且在每个文件夹下创建 index.md文件,文件内容如下:1
2
3
4
5
title: 分类
date: 2018-01-03 17:34:24
type: "categories"
重启hexo后即可实现导航栏的成功添加。在解决menu这个问题时曾经发现几个坑,不注意的时候可能会踩到坑,希望记录下来和大家多多交流:
- 导航栏可以成功显示配置的英文字母,但没有图标与之对应,发现这个问题后参考了默认的menu的配置,发现问题是
home: / || home中的|| 和之后的内容没有加上导致的,通过这个可以判断出|| home这个是导航栏图标的配置,需要根据自己的需求选择;- 语言问题,导航栏配置成功后发现语言一支不对,自己乱鼓捣了一遍,最后是修改 ${MY_BLOG_DIR}/_config.yml 中的
language: zh-Hans搞定的,具体是不是这里还需要在确定一下
RSS
Reference
20分钟教你使用hexo搭建github博客
Hexo官方文档
Hexo博客个性化及NexT主题配置
Hexo 主题设置
hexo生成博文插入图片